Tuesday, November 26, 2013
Sunday, November 24, 2013
25 little things to cultivate a creative art room culture
It can happen. If you set up the culture of your classroom just right and if you make sure all of the kids needs are being met, you CAN keep a class full of 30+ middle schoolers with a variety of needs fully engaged and excited about learning and creating. A must see visual featuring five levels of engagement put out by educationaltechnology.com has been floating around facebook this week. If you haven't seen it yet, click on the link above. I thought I would spend a little time this week writing about the everyday little things I do that add up to create a creative HIGHLY ENGAGED culture in my middle level classroom.
- Create and post everywhere a stress-free classroom motto like, "You are not here to prove yourself, you're here to improve yourself." Talk about it.
- Tell your students, "Only you know the right answer". Make them discover their own solutions to problems. Have them use you as a coach and not the "end all be all" source of knowledge.
- Have your students free write often to sort out ideas, but do not require them to show you everything that they write. Respect their confidentiality and soon they will feel safe to share on their own.
- Model creative behaviors. Share the creative ideas of others. Tell your students when and how they have inspired you!
- Don't sit behind your desk. Get up and circulate, talk about the weekend, tell a funny story, be a real person to your students.
- Help your students find their own passion. Share your passions with them.
- Offer lots of opportunities for students to work collaboratively or independently as they choose.
- Say "Yes! How can I help you get started?" when students approach you about doing something different as an alternative to the assignment. If they are seeking alternatives, that means they are thinking! I have never been let down by a student who wanted to take something in their own direction. It's about letting go of some control.
- Do your best to remove barriers to creativity. In the middle grades especially, the fear of not being able to make something look right can really deter some great ideas. Students (and adults) will often choose an easier or less creative idea if it means they don't have to struggle with making something look exactly right. Occasionally allow students to skip over technical skill development in order to achieve creative meaning in their work. (Collage is one method, I'll write about others in a future post.)
- Encourage wierdness, silliness, play good music that everyone likes, dance and sing and make a fool of yourself from time to time. Creativity dies in a sterile environment.
- Give your students "tools" to work with. Doing something without care is meaningless. Let them choose which tools they need for each job. Occasionally, pull a student aside and give them the "special" drawing pencil or "super expensive" :) drawing paper and see what they do with it.
- Give them informal opportunities to become experts with a particular media and allow them to teach you or another student something they discovered.
- Even if you don't feel the most confident with technology, offer technological options for your assignments. I learn so much from my students this way and they love showing me new things.
- Don't ask or tell your students to do their work, invite them to experience.
- Consider what personally engages and excites you as an artist or creative person. Think of ways this can translate into your classroom. Don't put your kids through those boring foundations lessons you suffered through in your undergrad program. Find better ways to teach boring things. If it's not enjoyable, why do it?
- Require students to respond differently from each other.
- Tie everything you can into their everyday experience and provide new experiences for them too. Ask them how their work relates to their life.
- Everyone likes to learn, our brains are hardwired for it. The trick is to make sure that you are teaching something that is new. How many times do you think a middle school kid has made an artwork about "line" since they started school? They get it, "a line can be straight, jagged, curvy or implied". So what? What have you learned that's new to you? If it's new to you, you are likely to be inspired, share that with them instead. I bet they end up using "line" in their work.
- Be funny, truly care for each child, look for opportunities for growth, put in the extra time whenever possible and most importantly, you must love your (work?).
- Begin each class with a creative warm up that encourages off beat thinking and is not skill based. Offer opportunities to share the silly responses daily on the projector. It helps build class community. (watch for prompts in a future post)
- Challenge your students to know more than you know. It's ok not to know everything. Consider yourself a student in the presence of many teachers.
- Introduce your students to new ways of thinking by asking good questions, with starters like "What if..., When can..., How might...., Why doesn't..., Who does... ?"
- Provide opportunities for students to share and respond to each others work constructively both formally and informally. You should model appropriate comments as a guide.
- Keep working on an idea until you are excited about every part that you will teach. If you are not excited, how can you expect your students to be?
- Have high expectations for yourself and your students, you will all rise to meet them.
Please share more ideas in the comments section of this post! Have a great week!
Tuesday, November 19, 2013
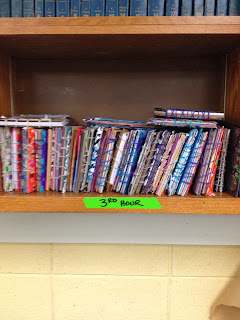
Handmade Creative Journals
I love playing with new ideas and discovering better ways to make things. Last year, when I started this course, I wanted to find a place for my 750 (annual) students to explore a few minutes of daily creative writing and visual responses to warm ups. With a tiny budget to work with, I cut single subject lined notebooks into thirds for kids to use. While this worked, and was economically efficient, I wanted to find a better way. I admit when it comes to art materials, I am a hoarder. I'm afraid of letting go of some little doo dad that I just may find a use for someday. I have loads of all kinds and types of paper in my storage closets donated from printing companies and bleached out crumbly construction paper circa 1975. Knowing I had paper to spare, I thought I could try my hand at stitching handmade journals with my students and put these materials to use. For a small amount of cool patterned duct tape (cheaper stuff would work, I'm sure, but I just love the patterns) and the scrap supplies that most of us already have in abundance, students are able to make a fresh 40 page handmade book each marking period.

Step Two, Day Two: Pasting the cover paintings on the cardboard and making paper stacks

Step by step process, 50 minute class periods, approx 30 students per class:
Materials: Small amount of Acrylic Paint, Paper Mache Paste, Newsprint, Loads of Cheap Paper cut to 6" x 9" or smaller (you could cut down copy paper for this size book as well), Two 6"x9" cardboard rectangles, about 6 rolls of duct tape per 150 students, masking tape, yarn, yarn needles, 40 binder clips (to be reused over the course of two days), dremel drill
Step One, Day One: Making the cover sheets and experimenting with color
- Paste painting on a sheet of 18 x 24 thin newsprint.
- The students make their own cardboard tools to play in the paste with.
- The paste paint is a mix of approx one cup of paper mache (art paste) and a tablespoon of acrylic paint. I give each table 3 -4 colors to play with and popsicle sticks in the container so they don't contaminate the original color. A little goes a long way and it leave a nice glossy sheen that is resistant to smearing.
Because I have so many students and not much of a drying rack, I spread dollar store plastic tablecloths around the room on the floor to set their paintings out to dry on. The plastic sheets resist the paper mache paste so the paintings peel right off in the morning.
- Students are given two 6" x 9" rectangles of cardboard (I spend a day after school in advance jamming out to 90's girl power radio and just work that paper cutter til it's toasty). It saves the in-class stress for me to pre-cut the cardboard for so many students, but if you want them to cut their own, more power to you!
- They cut one approx 1" strip off of the long end on only one of the boards. They save this cardboard strip in their art folder until the next day. (The strip is used to help make the front cover bend open later.)
- Students cut their paste painting in half and determine which half will make up the front of their book and which will cover their back.
- The smaller of the two boards will become their front cover. Students precut the paper to make a book seam around the cover board (I say it's like wrapping a present).
- Then, we use big paintbrushes and clear paper mache paste to completely cover the backside of the paste paper. The paper wraps around the edges of the cardboard covers and makes a nice book edge.
- Students wrap both their front and back boards this way.
- Students are then given a 6 x 9 sheet of copy paper or other scrap paper to cover the interior side of the cardboard that is still showing. Some students use empty envelopes in this space as well (I happen to have a lot of those too. ) They will later write their name and hour on this paper when it's dry.
- The covers are set out to dry on the plastic tablecloths again overnight.
- Remaining class time is spent collecting/assembling 40 different pieces of paper for their books. I also encourage students to bring paper from home in or other things they might like in their book. The students decorate the edges of their paper and even customize some pages to fold out or to have different shapes. You could spend two days on this step if you wanted to.
Step 3, Days 3 - 4 Assembly, if your class is small, you can probably do this in one day, but since there are thirty of them and one of me, it takes two days. Early finishers can work on decorating their pages.
- When students come in the room, I ask them to gather both cover boards, their 1" cardboard strip and 40 page paper stack.
- At the front of the room, I have 3 - 4 different patterned duct tape choices (I pull out more as they get used up, too many choices makes it tough to manage) and a 12" measuring piece of regular masking tape taped onto the table so they know how long to cut their duct tape.
- The students reattach their cut off cardboard strip to their shorter cover board ONLY by wrapping their duct tape strip around it front to back. (I could have the students make their back covers bend too, but that would mean I'd have to buy more duct tape.)
- Then, when all of the pages are gathered and the front and back covers are in place, be sure they are all pushed to the edge of the cover where the duct tape is.
- Use a large binder clip in the center of your book stack to hold it all in place.
- Use a dremel drill to drill 5 - 6 holes through the whole stack. Leave the binder clip on so the holes stay aligned. I let my students try this if they want to. I drill the stack over the edge of a counter so I don't have to worry about drilling into the counter.
- Once the stack has been drilled AND the binder clip is still left on, students are directed to the counter where another longer piece of masking tape measures off how long they need a piece of multicolored yarn to be for them to stitch their binding together
- Students can experiment with sewing their bindings in all sorts of patterns. The important thing is that they are sewn through around the spine several times. The books are used daily in my room and need to be able to withstand middle school student abuse for 9 weeks!
- Once the yarn has been tied off to itself, the students can return the needles and the binder clips and their book is complete! (now, please write your name and hour in the front cover!)


Sunday, November 3, 2013
Changing my job description
Ask any art teacher why they think their class is important
and I'd bet most of them would mention among other things that their class teaches students to be
more creative. But let’s look at
our practices critically.
As an art teacher, do you actually teach kids how to be more creative? Is painting a color wheel a creative act? Is painting a copy of a famous artwork creative? What if it's a monochromatic self portrait? Is making a coil pot a creative act? Our are students more creative after having done these exercises? How much of your curriculum do you devote to skill based lessons? How much do you devote to critical thinking and creative ideation?
If you know my history as an art teacher, and I'm guessing if you are reading this, you do, you know I've gone through some changes in the way I teach. I entered the profession in the usual way. I went to college and learned how to get good grades by by mimicing whatever style of art work my college teachers made. I was trained in DBAE (Discipline Based Art Education) and was well versed in all things a good art teacher should know about how to construct a solid lesson. I know how to make a lesson that could rival the content knowledge of any other subject area in school. It should be rigorous with Art Production, Art History, Art Criticism and Aesthetics. Lessons also are encouraged to be multi-disciplinary in nature, have a reading and writing component and include a "multi-cultural" angle.
Whew! But I could do it with the best of them. If there was a "right way" to do something, I was going to do it! Looking back at some of the things I had my students do (with all of the best intentions) I make myself cringe. My elementary students made very beautiful copies of Van Gogh's Starry Night in oil pastels, high school students made spectacular large scale fingerprint portrait of themselves ala Chuck Close and my middle schoolers made fantastic color wheel versions of famous paintings. And at the end of the marking period, semester or school year, I would have a decent handful of these masterpieces tossed into the trashcan by their creator without care as they walked out the door.
When I applied for a Masters in Art Education Degree at the Maryland Institute College of Art (MICA), I was searching for something more. Frustrated with the numbers of students in my classes who only thought art was "Just OK", I wanted to learn what I could do as the teacher to affect the level of engagement for my middle school students. Part of my studies included conducting classroom research. I sought out to compare the levels of student engagement when students are challenged with a traditional, DBAE style, closed art problem with representational constraints Vs a more ill defined art problem without representational constraints. Problem 1: "Create a triptych of yourself with a realistic self portrait in the center panel, the left panel a drawing of a road with symbols that represent those events that have led you to where you are today and on the right panel, a road with symbols of what you predict will become your future." Vs. Problem 2: "Create a self portrait in a container form. On the outside, use those shapes, textures and colors that represent how you think others view you, and on the inside, use those shapes, textures and colors that express how you really are."
Without surprise, the more open art problem that did not require representational realism from my middle school kids elicited a higher engagement response. It was during this study that I became familiar with the work of Dr. Sandra Kay, an art educator with an extensive background in gifted education. She is one of the coauthors of a book called "Creating Meaning through Art: Teacher as Choice Maker". In it she discusses something called an "Elegant Problem". An elegant problem is one that invites fluency, flexibility, originality and elaboration in it's responses. I also became familiar with the work of Sydney Walker and the "Big Idea". Big ideas are large and complex and can sustain an artists work over large swaths of time. I began thinking about how I could give my students the opportunity to think and behave as "real" artists do. I began to examine my own practice and explore teaching students about the art world through the development of elegant problems and big ideas. Instead of coil pots, my students began making plates that represented dreamscapes. Paintings of still life objects soon became paintings that revealed their biggest pet peeves. Things were getting better, my students were making art that held meaning for them. They were beginning to behave like artists.
Could there be anything more? Are my kids really engaged? YES!!! They are loving it! Way less art is making it to the trash can. They are behaving like artists, (but are they thinking that way?). Do they view themselves as creative? So, I asked them. There were still a handful that struggled with the "big idea". What did I do about it? To be honest, like I think most good teachers do, I rescued them. In all of my good intentions, I "helped" them brainstorm for ideas. I set the problems up so that they could think about them in certain ways. I provided brainstorming worksheets and had them search for ideas out of freewriting exercises. Most of my students could fly with the ill defined prompt with these aides, they would create very cool independent looking things and would begin to see themselves as real artists, but there were about 4 -5 in each hour that needed me to hold their hand through the ideation process. Sometimes the projects of neighboring students would end up looking eerily similar. I chalked it up to possible developmental delays, but I knew it deep down, I was not teaching them "how to think". These were the future adults who would someday say "I'm not creative", "I wish I could come up with ideas like that". Now what?
I did some more reading and scavenging. How do you teach creativity? What can I do as an art teacher to help my kids reach their full creative potential?
Things didn’t really start to change for me until I begun to think of myself as a “creativity teacher that uses art as a vehicle to get kids thinking differently” rather than “an art teacher”.

Imagine if all the subjects in school were taught with an emphasis on creativity first and subject secondary? For advocacy’s sake, speak to the benefits of creative problem solving and critical thinking for your students. But first, examine your actual practice, are you teaching the kids how to be more creative or are you teaching them how to follow directions, or make art that looks like ______? Or in the style of ____? Or to demonstrate the skill of ___? Or to show that they understand the definition of a vocabulary word?” There is a difference between being “an art teacher” and a “creativity teacher”. Which do you want to be? What do you think is more important for kids? Can you be both? Let's talk!!
Subscribe to:
Posts (Atom)