Saturday, November 8, 2014
Sunday, November 2, 2014
Saturday, October 25, 2014
Using Optical Illusions to Teach Perspective

One of my favorite things to teach is perspective drawing. I normally would introduce the concepts using mini lessons, introducing the vanishing point and one and then two point perspective. We would draw increasingly difficult house features, interior spaces and monster trucks.

This marking period, I thought I would try to introduce some of the concepts of creating depth on a 2D surface through figuring out how to make optical illusions. We started with making some impossible shape drawings.

We then moved on to playing with the shape of the paper and the cast shadows. We are still novices, but I'm pretty proud of my 6th, 7th and 8th graders attempts.

This activity also slyly introduced the importance of using value to create volume. If we were in class together longer than nine weeks, I would have pushed them a little more in developing that skill.

Hovering basketballs…oooooh

The kids also enjoyed coming up with ways to create disasters. the drawing above is of a students mom's minivan falling through the street. That would be a bad day!


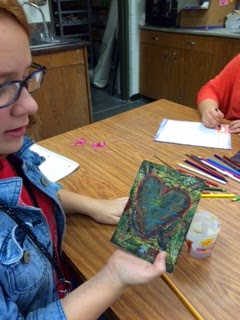
Above: One of the practice drawings we made as a class to learn the basics of perspective as they apply to creating illusions. They loved this one and begged to take it home right away! (I found the example online.)

I think this student is right, UFOs probably did take away all of the bigfoot creatures.

Above: One of the practice drawings we did as a class so they could understand some of the "rules" of creating believable optical illusions. (Also, an example I found online, I didn't really know how they were made myself until I started playing around with it). I think it is important to let your students know you are learning all the time too.

Watch out for never ending portals!
Wednesday, October 15, 2014
Artists Experiment with Materials and Ideas
.jpg)
"Let's just see what happens." says one of my 8th grade boys to his tablemates as he dips one his experimental mini lesson samples into the dirty water container.
The new National Core Art Standards are intentional about encouraging students to take creative risks, experimenting with both ideas and materials.
 |
| A typical class periods "Learning Targets" and "Success Criteria" |
Before we begin each art problem, my student will have a few
days in preparation talking and sketching about ideas they can use to approach
the problem and they play with different media that they might want to explore
further in their final piece. In the photo above, my students are experimenting
"painting without paint" and are creating mini samples on budget watercolor
paper with coffee, different flavors of tea, dried out marker foam inserts that
had been soaking in warm water, koolaid flavors, and tissue paper that bleeds.
They applied the media with the tea bags, straws and even their fingers.
 The
next day, we worked back into the samples with fine tip sharpies, watercolor
pencils and watercolor crayons. In two days time, the students are introduced
to a wealth of art making strategies that they can have in their toolbox for
future use as they so choose. Making the samples is important as it helps
encourage risk taking. They can play with their ideas in a smaller, less risky
place and if it doesn't work, they discover that it's ok, really. They can try something new and just see
what happens. In the photo to the right, the students are spending just a few minutes of a few class periods thinking about their ideas in new ways; in example, how could they apply their idea as a diorama, as a sculpture, as a painting, as part of a series of works, by incorporating an older peice of work made in class, etc. I've found that it's helpful to stretch the planning time for a problem over a few days in smaller chunks rather than doing all of the planning in one full class period. Their ideas are richer, they seem more engaged in the lanning process, and they actually spend more time thinking about their work in new ways (growing creatively), in the long run.
The
next day, we worked back into the samples with fine tip sharpies, watercolor
pencils and watercolor crayons. In two days time, the students are introduced
to a wealth of art making strategies that they can have in their toolbox for
future use as they so choose. Making the samples is important as it helps
encourage risk taking. They can play with their ideas in a smaller, less risky
place and if it doesn't work, they discover that it's ok, really. They can try something new and just see
what happens. In the photo to the right, the students are spending just a few minutes of a few class periods thinking about their ideas in new ways; in example, how could they apply their idea as a diorama, as a sculpture, as a painting, as part of a series of works, by incorporating an older peice of work made in class, etc. I've found that it's helpful to stretch the planning time for a problem over a few days in smaller chunks rather than doing all of the planning in one full class period. Their ideas are richer, they seem more engaged in the lanning process, and they actually spend more time thinking about their work in new ways (growing creatively), in the long run.Intentionally building play and creative risk taking into the curriculum is essential for teaching for creative growth.
Sunday, October 12, 2014
Creepy Cute Challenge
Inspired by a lesson from Olivia Gude's Spiral Workshop , My students investigated the Creepy/Cute Aesthetic. I showed them a Blendspace collection of images and videos I found online that explored the psychology of what makes something creepy and what makes something cute. Click here for the link to everything I showed my students.
Essentially, it comes down to this:
You can make anything cute by "babyfying it". Make it soft and give it rounded edges, smaller than normal and, if it has facial features, it should have big smiling eyes.
You can make anything more creepy by bringing it close to the edge of really human like, but obviously not really behaving like a human should. ie. clowns, porcelain dolls, mannequins,etc. The more human like it is, but it's just a little "off" in the way it behaves, it gives you the creeps. Not grossed out, just makes you uncomfortable.
There is actually a psychological definition for this uncomfortable mental space. It's called the "Uncanny Valley". V Sauce (One of my favorite You Tube characters), makes a great video about it here.
One of the fun parts about being an artist and teaching kids how to make art, is to give them the tools to make the viewer feel and respond a certain way. The challenge for this creative problem was to encourage the viewer to either respond with "Awwww, it's soooo cute!" or "Ewww, that gives me the creeps!"
Here are some of my students responses to this creative challenge. Many of them altered their own photographs digitally using free photo editing apps. Some made their dog cuter by enlarging his eyes or themselves or a baby sibling creepier by making it just a little "off" and then worked from there to create drawings. At the end of the challenge, they lined their work up and made a scale ranging from the creepiest to the cutest. It was a fun conversation. I bet they won't forget this project for a long time!
A
Essentially, it comes down to this:
You can make anything cute by "babyfying it". Make it soft and give it rounded edges, smaller than normal and, if it has facial features, it should have big smiling eyes.
You can make anything more creepy by bringing it close to the edge of really human like, but obviously not really behaving like a human should. ie. clowns, porcelain dolls, mannequins,etc. The more human like it is, but it's just a little "off" in the way it behaves, it gives you the creeps. Not grossed out, just makes you uncomfortable.
There is actually a psychological definition for this uncomfortable mental space. It's called the "Uncanny Valley". V Sauce (One of my favorite You Tube characters), makes a great video about it here.
One of the fun parts about being an artist and teaching kids how to make art, is to give them the tools to make the viewer feel and respond a certain way. The challenge for this creative problem was to encourage the viewer to either respond with "Awwww, it's soooo cute!" or "Ewww, that gives me the creeps!"
 |
| Ummm, ok, yuck. |
 |
| Don't look behind the curtain! |
 |
| What is up with those eyes? |
 |
| An undead baby sister, creepy! |
 |
| Not sure where this fit on the scale, but it sure was interesting. |
 |
| Enhanced for cuteness family pet drawing |
 |
| One of the hourly line ups taking shape |
 |
| Ooooooo Ooooooo... |
"Improved" Artwork
Last year, one of the marking period themes was "Humor". Inspired by remix artists my students and I have seen online, we scavenged up some large old framed prints for my students to "improve". Here are some of their works. I hope they make you giggle as much as my middle school artists did while they were painting them.
 |
| Warning! This beach has sea dragons! |
 |
| If you can add a Lego knight and a castle, you probably should. |
 |
| Lizard Lady. I actually prefer this version better than the original. :) |
 |
| This work was made by one of my cognitively impaired students, he was soo proud! |
Guerrilla Kindness
Do your students beg you for homework? Mine do, probably because they know it would be fun. So, last winter, I challenged them to spread a little "guerrilla" kindness in the world. Some kids shoveled driveways for free, others cleaned their rooms without asking, some left notes for strangers to find. Here are a few of the examples they shared with me. I was told by one staff member that one of her 8th grade "tough" girls returned from a bathroom break almost in tears because she was so happy to see these post its! I have the best job!


5 Minute Design (A warm up game)
I’ve completely made it up and it definitely needs some tweaking, but the rules are essentially this:
The whole class is introduced to the method of the game. The point of the game is to increase ideation fluency, collaboration, risk taking and communication skills. To get them thinking on their feet quickly, I project the descriptions of the steps on the screen and just watch the clock and tell them when to move to the next step. If you are comfortable with using a timer, that might be nice too. It’s not really “design thinking” as much as it forces them to get moving fast. If you teach adolescents in the morning, you might understand the need this game is providing. :) So far, it’s been a warm up the kids have liked (middle school). The students work in groups of four – six. Sometimes they work by table and sometimes I break the group up into different configurations so they work with new people.
I try to pick objects for them to redesign that they already feel comfortable with and use on a nearly daily basis, and something I have in my classroom for them to look at as they think. Examples: backpack, flashlight, pencil case, etc
 |
| A crayon picture I made for an assessment workshop, just so this post wouldn't be visually boring. You're welcome. |
1 minute – kids quietly and independently list everything they know about that particular object in their sketchbooks
1 minute – team makes a pro/con list about the object they are redesigning. They need to list all of the good things worth keeping and the problems they have had with that object. Ex backpack "pro" is that you can find it in many colors/patterns and a backpack "con" could be that the zippers can break.
2 minutes – team makes sketches and plans to enhance the "pros" and repair the "cons". Like they say at IDEO, “All ideas are good ideas” and for this game money and practicality are not obstacles.
1 minute – team plans a creative presentation. I require my students to at least stand up front with their team, even if they choose not to be the one speaking. As the marking period goes on, I find that they gain a little more courage, and eventually, most kids will speak at some point. Now that we have crossed the halfway marker of the marking period, the presentations have actually gotten pretty good, despite the one minute planning time for them. They usually involve some sort of physical interaction with said object and jet packs or invisibility cloaks.
We spend about 5 – 10 minutes watching the team presentations with time for clapping/cheering and questions/comments in between groups. If you wanted to extend this, you could have the kids ask questions and then ask the teams to go back and redesign their work and re – present. I haven’t tried that yet, but it’s an idea.
Tuesday, June 10, 2014
Stop Motion Animation Shorts
Creating with Technology
Our district has recently implemented a mobile 1:1 program. This means that all of our students will have access to technology both in school and at home through the use of school provided mobile devices with 3G. The students are highly engaged in learning how to use their devices in new ways. I am highly interested in offering a 21st century curriculum by encouraging students to collaborate with each other to solve creative problems using technology as a creative tool.
Experimenting
First, we just played. I think it's important to give the students an opportunity to experiment with the media they will be using in depth later. It's also a nice hook. We experimented with several movie making apps and made little movies about scissors moving across the table or pencils disappearing into their hands. Students were encouraged to explore free apps that they could find and to settle on one that worked best for them (that also had a share feature).
Practicing Skills
Some students used the school provided Android based phones (stop motion lite) and while others used their personal iPads or iPhones (gorrillacam and iMovie) to explore movie making apps. We practiced saving and sharing our work via Google Drive.
Investigating
Next, we dissected the qualities of good stop motion animation via several You Tube clips ranging from very amateur to professional. The students developed an understanding of how character development, story, camera angles, frames per second and a stationary camera can impact the quality of a stop motion movie. Blendspace link to all of the clips
Collaborating and Building Community
The students divided into teams and developed plans for their movies. No minimum length was given. No parameters for content were set. The goal was to make a film that could tell a story, any type of genre would do and any method of character development would be accepted. As a first project with a new group of mixed 6th - 8th grade students, this learning experience was as much about building community as it was about building movie making and technology skills.
Open Ended Problems
I purposely did not tie a theme to their work or require a specific meaning making target as I was interested in what they would choose to do if given free reign of subject. I am always searching for what is meaningful to my students. I want them to think and behave as artists do. Setting a meaning making target or theme will help do this. Sometimes though, (like for this problem) I like to intentionally step back and just observe where they are at and notice their interests.
Students collaboratively developed storyboards and made props. They did not seem to struggle with developing ideas and many noticed how having a team to collaborate with really helped.
Groups wrote love stories, adventure themes, reenactments from films they have seen or books they have read and some were screen versions of characters the students had previously developed through their own creative writing. Of course, as expected there were the ever popular epic battle scenes, some groups tried to defy the laws of nature and some were just plain silly. My role in this creative problem finding/solving adventure became materials facilitator, collaboration coach and tech consult.
While I see the value in inviting students to have full creative license in their story production, I think that next time I will close the problem just a little bit and offer a range of four or five themes for them to choose from. When editing the works together, the final product would be more cohesive if they could be grouped in this way. I'm leaning towards the themes of transformation, growth, community and interdependence.
Inventing
Students made their movies from a wide variety of materials. Each group chose among many things including paper, modeling clay, toys, cardboard, tools,whiteboards with Expo markers and some groups used their own bodies.
One of the challenges that many of the groups had in making their films involved finding ways to keep the camera still. The three tripods our media center had to loan only worked for flip cameras. The kids became pretty inventive, taping their phones and iPads to upside down stool legs and using binder clips attached to books and other things to keep their shots consistent.
When I try this again with a new group, I will invite the students to spend more class time investigating the benefits and limitations of each of the material choices. We may even spend a few days making more "practice" videos with each of the material options. I also hope to find some grant money for some movie making materials, including a set of ten or twelve tripods.
Sharing an Experience
Our district has recently implemented a mobile 1:1 program. This means that all of our students will have access to technology both in school and at home through the use of school provided mobile devices with 3G. The students are highly engaged in learning how to use their devices in new ways. I am highly interested in offering a 21st century curriculum by encouraging students to collaborate with each other to solve creative problems using technology as a creative tool.
 |
| Planning camera angles |
 |
| Filming in progress |
First, we just played. I think it's important to give the students an opportunity to experiment with the media they will be using in depth later. It's also a nice hook. We experimented with several movie making apps and made little movies about scissors moving across the table or pencils disappearing into their hands. Students were encouraged to explore free apps that they could find and to settle on one that worked best for them (that also had a share feature).
Practicing Skills
Some students used the school provided Android based phones (stop motion lite) and while others used their personal iPads or iPhones (gorrillacam and iMovie) to explore movie making apps. We practiced saving and sharing our work via Google Drive.
 |
| Experimenting with ideas |
Next, we dissected the qualities of good stop motion animation via several You Tube clips ranging from very amateur to professional. The students developed an understanding of how character development, story, camera angles, frames per second and a stationary camera can impact the quality of a stop motion movie. Blendspace link to all of the clips
Collaborating and Building Community
 |
| Testing the background |
 |
| Building characters |
I purposely did not tie a theme to their work or require a specific meaning making target as I was interested in what they would choose to do if given free reign of subject. I am always searching for what is meaningful to my students. I want them to think and behave as artists do. Setting a meaning making target or theme will help do this. Sometimes though, (like for this problem) I like to intentionally step back and just observe where they are at and notice their interests.
Students collaboratively developed storyboards and made props. They did not seem to struggle with developing ideas and many noticed how having a team to collaborate with really helped.
Groups wrote love stories, adventure themes, reenactments from films they have seen or books they have read and some were screen versions of characters the students had previously developed through their own creative writing. Of course, as expected there were the ever popular epic battle scenes, some groups tried to defy the laws of nature and some were just plain silly. My role in this creative problem finding/solving adventure became materials facilitator, collaboration coach and tech consult.
While I see the value in inviting students to have full creative license in their story production, I think that next time I will close the problem just a little bit and offer a range of four or five themes for them to choose from. When editing the works together, the final product would be more cohesive if they could be grouped in this way. I'm leaning towards the themes of transformation, growth, community and interdependence.
Inventing
Students made their movies from a wide variety of materials. Each group chose among many things including paper, modeling clay, toys, cardboard, tools,whiteboards with Expo markers and some groups used their own bodies.
One of the challenges that many of the groups had in making their films involved finding ways to keep the camera still. The three tripods our media center had to loan only worked for flip cameras. The kids became pretty inventive, taping their phones and iPads to upside down stool legs and using binder clips attached to books and other things to keep their shots consistent.
When I try this again with a new group, I will invite the students to spend more class time investigating the benefits and limitations of each of the material choices. We may even spend a few days making more "practice" videos with each of the material options. I also hope to find some grant money for some movie making materials, including a set of ten or twelve tripods.
 |
| Making "fireworks" |
The students finished their very short animations in time to be edited together (thanks Jim!) into one large production. This feature was premiered prior to an annual after school art event called the "Trashion Show" that I will post about soon.
Reflecting
The students reflected upon the success of their films and the process of collaborating with others. We talked about how essential collaboration is to the creative process. They wrote and/or recorded "words of advice" for future classes who will also experiment with making stop motion animation films. Some of their "words of advice":
"It's good to work with your friends, it can be easy when they help come up with ideas, but sometimes hard too. You have to learn to deal with problems together."
"Being creative and making movies is fun, but it's also a lot of work. If you try to do your best and work hard, you can surprise yourself."
"Make sure you take lots and lots of frames per second, otherwise your movie will be choppy and too fast."
"Be sure to save your work a lot. And always have a back up plan if your first idea doesn't look as good as you thought."
"Decide who will be in charge of the camera and who will move the stuff around. Keep your phone still or else your movie will look like there's something wrong with it."
"Use your time well. Don't think you can wait until the last minute because you can't."
Below are three of my favorite student made movies. I hope you enjoy them as much as my students and I do!
 |
| The students were completely engrossed watching their own movies on the big screen for the first time. You could have heard a pin drop. |
The students reflected upon the success of their films and the process of collaborating with others. We talked about how essential collaboration is to the creative process. They wrote and/or recorded "words of advice" for future classes who will also experiment with making stop motion animation films. Some of their "words of advice":
"It's good to work with your friends, it can be easy when they help come up with ideas, but sometimes hard too. You have to learn to deal with problems together."
"Being creative and making movies is fun, but it's also a lot of work. If you try to do your best and work hard, you can surprise yourself."
"Make sure you take lots and lots of frames per second, otherwise your movie will be choppy and too fast."
"Be sure to save your work a lot. And always have a back up plan if your first idea doesn't look as good as you thought."
"Decide who will be in charge of the camera and who will move the stuff around. Keep your phone still or else your movie will look like there's something wrong with it."
"Use your time well. Don't think you can wait until the last minute because you can't."
Below are three of my favorite student made movies. I hope you enjoy them as much as my students and I do!
Sunday, March 23, 2014
Teaching FOR Creativity: Pretty cool preliminary data
Teaching FOR Creativity: The preliminary data…
So far, I've been writing about things that I've been trying in my classroom to encourage creative thinking and have posted some examples of lessons, book reviews and other rambling ideas that I have on the topic. One thing I haven't done yet is show some of the preliminary data I've been collecting.

Here is the data, in visual form from last (2nd) marking period. It shows the average amount of responses from 150 students on three separate testing dates over a nine week marking period. As I get new students every nine weeks, I am focusing on adding assessment for an additional component of creativity. Next marking periods data chart will also show assessment for elaboration.
Fluency: The number of ideas students can come up with in a defined amount of time. For this marking period, students were given 3 minutes to come up with a list of ideas of things you could do with the following objects on these dates: 11/1 a dollar bill, 12/1 a fork and on 1/13 a sheet of computer paper. The average of 150 students results are shown in blue.
For this test, I'm just looking for the number of ideas that the student can come up with. Creative or not, all ideas count!
Flexibility/Originality: The number of original ideas or ideas that show flexible thinking when thinking about what they could do with an object. In example, a flexible response for a use for a fork could be "using forks to link/weave together to make a screen door". An inflexible or unoriginal response might be "to eat with" or "to stab something with". The average of 150 students results are shown in red.
For this test, I spent a considerable amount of time reviewing all of the students fluency lists and made a master "common response list" of typical object use ideas. All ideas that showed flexible or original thinking made the cut to count for the students "flexibility/originality" score.
What I'm noticing: While it's great that both fluency and flexibility/originality numbers rise as the marking period goes on, it is interesting to notice some of the particulars. Most obvious is the rate of change from the first test date to the second test date. While the amount of original/flexible ideas dramatically rises, the overall fluency numbers rise just a little. My theory is that as students learn how to come up with more creative /flexible thinking, their internal veto system sets in and they start to cut out the less original ideas and accept only the more creative ideas that seem worthy to put to paper. By the end of the marking period, they finally "get" that "all ideas are good ideas" and know that the more ideas they generate, creative or not, the better.
This marking period, in addition to collecting data on fluency and flexibility/originality, I'm also collecting data on elaboration. I am collecting data in two ways for this skill. The first is through asking the students to complete a simple drawing such as a circle or "S" shape and the other method is through seeing how many twists and turns a student can add to a story starter (elaborating on a story). These results will be available in a few weeks when the last batch of data is collected.
I love action research! I am always looking for people to collaborate with and hope that this blog reaches more people with this interest! I would love learning about other ways to collect data. Please comment and pass along! Thanks!
Franken Toys, Funny Drawings and Improvisation
FrankenToys, Funny Drawings and Improvisation
A typical week in figuring
out how to teach FOR creativity
I decided to write about this week for the blog because it
was a pretty average week, and it was one of the first weeks we haven’t lost a
day of instruction due to snow or ice or professional development. This winter sure has been
crazy in Michigan. I plan on using this blog entry as
evidence for my teaching practice for my principal as well, so I have
highlighted lesson plan elements in green throughout.
The theme for this marking period is humor, so far this
marking period, we have been practicing our ideation fluency, flexibility,
originality and elaboration skills through developing illustrated jokes,
humorous juxtaposed magazine and digital collages and we “improved” some tacky
Goodwill paintings.
We started the week working on a mini project PLAYING with
toys. “Play” is an essential component
to building creative thinking in students. It builds flexibility and it is the
root skill of elaboration. I can: experiment with
ideas and combine ideas in ways to make new meaning.
 |
| Student experimenting with ideas, making new meaning |
Monday, we began
with a clip from the movie Toy Story and watched Sid (the naughty boy next
door) “improve” his sisters doll Jaynie, by replacing her head with the head of
a pterodactyl. Here is the link to the Blendspace lesson I created that shows a
wide variety of artists solutions to creating “Franken Toys”, including a shorttutorial on how to best disassemble action figures and modify them. Direct instruction https://www.blendspace.com/lessons/hvZbCkGuLN7xPg/edit
 |
| T-Rex Baby by Claire D |
The students were given direction to play with donated
unloved or broken toys and just see what they could do with them for about ten
minutes. They had so much fun re-living
their earlier childhood, being silly and playing together collaborating. Next, I gave each of my students a
card from the game “Spot It”.
and gave them the instructions to pick out just one toy. The
cards are filled with pictures of all sorts of different things: anchors,
hearts, light bulbs, fish, etc. Students were to find a person with a matching
card and meet up with them to discuss and share ideas about different ways the
two new toys could be combined to make a new toy.
Think, Pair, Share
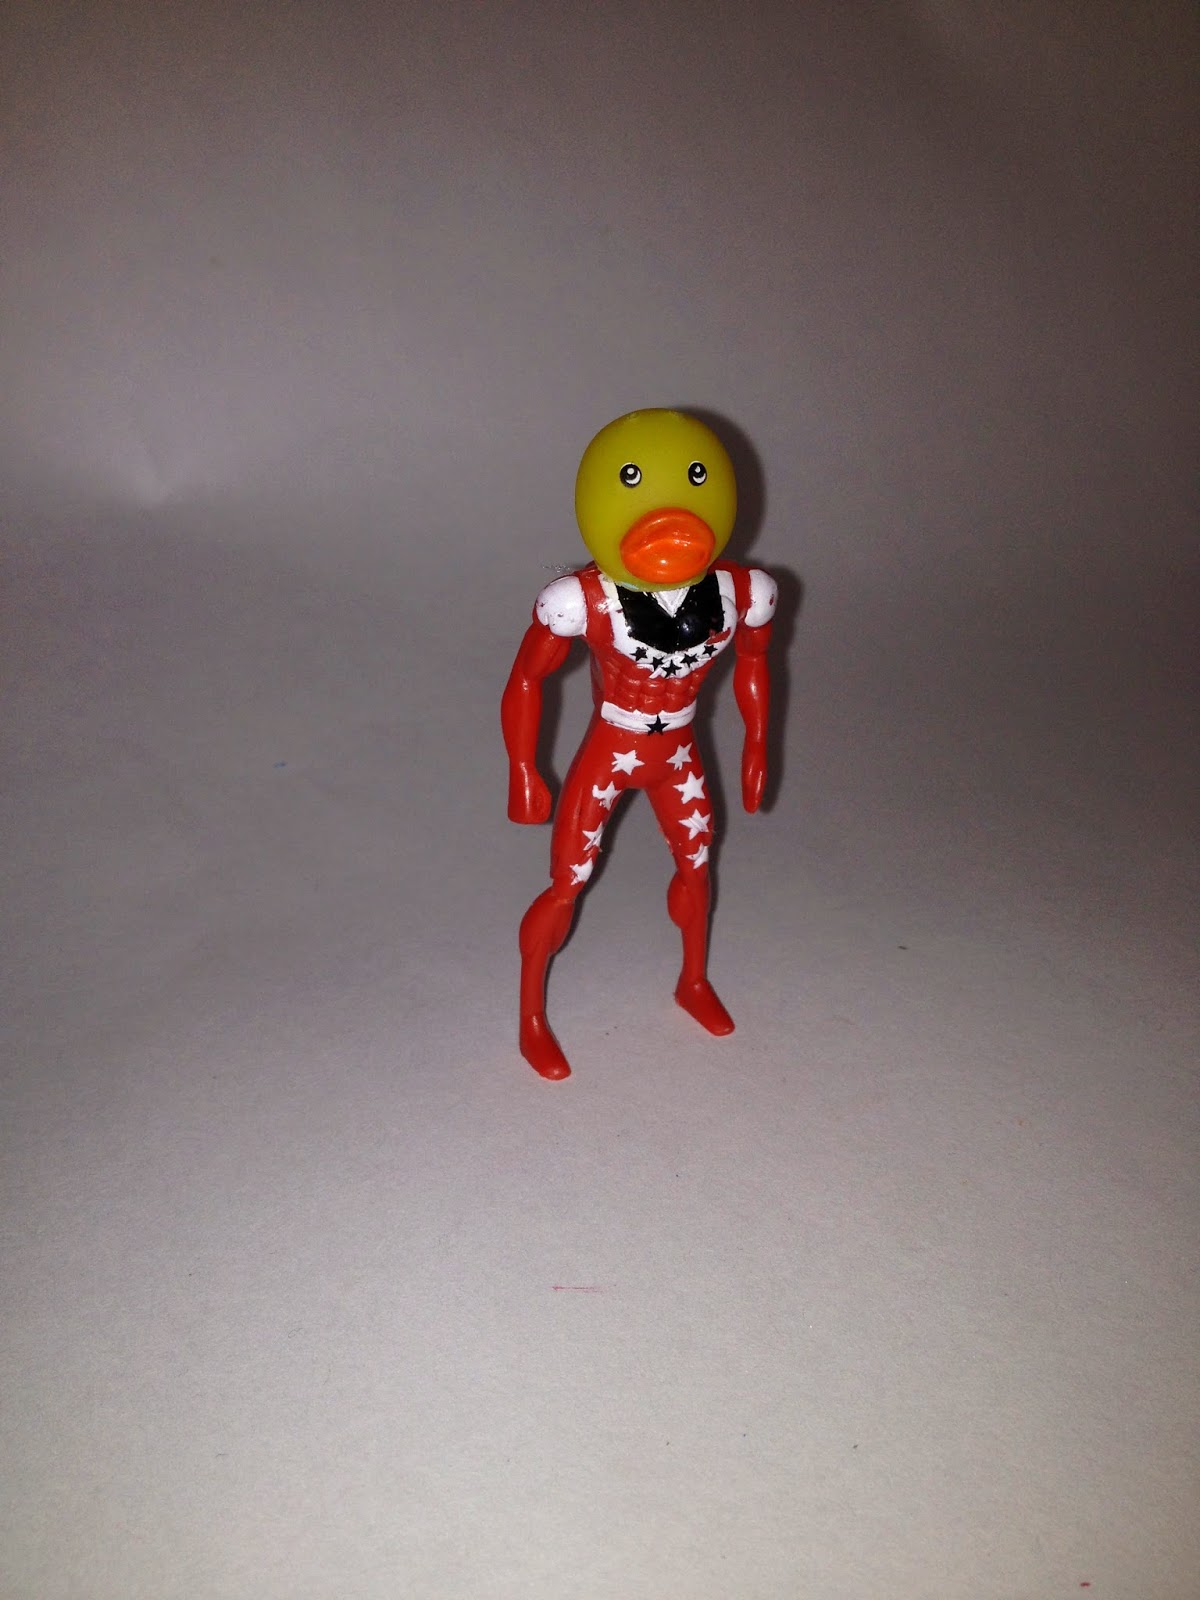 |
| Super Duck by Elliot L. |
After about five minutes, students shared out some of their
ideas and then were asked to trade toys with their partner and find a new
partner that also matched their card. This time, more rules were added to the
ideation game, not only did they need to combine toys, but also they had to
think about how one of the images on one of their cards could be worked into
the new toy design. Think, Pair, Share This
scaffolding process continued and new rules were added with each round. The
students were getting pretty excited about their ideas. The closing activity
included the last set of partners sharing out their plans for a new toy and
giving their new toy a name Exit Ticket.
 |
| Ultra mechanic by Jacob W. |
Tuesday began
with an activity Bell Ringer that invited the
students to select a toy from the bins and spend a little time with it, do a
little observational drawing in their books and diagram the best features of
the toy in detail. Teaching for Observation We talked a
little about what made the Franken Toys we saw on Monday in class successful
and we reviewed the three expectations for the mini-lesson: To combine toys in
a humorous and interesting way, to make the connections seem manufactured
(stitches neat, glue hidden from view, paint applied with care), and to create
a slogan, jingle or sales pitch for their new invention. Rubric
I gave two quick whole class tutorial reviews Direct Instruction on how to sew (many students had
had my class before and have already learned this skill from different lessons
and so could teach each other. I also reviewed
the safety measures that we need to take when using tools as in some cases toys
may need to be disassembled using screwdrivers, exacto knives, pliers or small
saws. We practiced the skills together and I made sure every student had the
skill set they needed in order to complete their work with care. Guided Practice
After I felt confident that they had the safety measures
under control, the students were set free to play with and combine toys. You
could have heard a pin drop, they were so engaged in play and experimentation.
 |
| Moo-rice Rodriguez with sidekicks in backpack by Adrianna B. |
Wednesday was a workday.
Students rushed into the room ready to explore what their toys could do. Many
had gone home and scavenged their own toy box and came in with new treasure
pieces they could add to their assemblage.
Students were given the choice to work
independently or collaboratively.
Thursday students
were asked to document their work in their
books, to make quick sketches of what they had combined and to come up with a
name for their new creation. Reflection/Bell Ringer
They had the rest of the hour to work on assembling the final details, but were
asked this time to think about what their slogan or jingle might be that would
go with their new toy design as they played with their ideas. This was really fun; you could hear the hum
of silly jingles and rhymes echoing throughout the room. As an Exit Ticket, the students were asked to write down
their slogan/jingle and new toy name on a slip that also served as a display
tag for showing off their new creation in our media center. Our media center looks pretty lively now!
Friday was our
first experimentation in using improvisation to teach for creativity. I currently have a pre-intern student teacher
from Kendall College of Art and Design, Clair Pearl, who comes on most Fridays.
She designed and taught this lesson under my supervision. I can: collaborate, listen and become comfortable with
change.
Clair began with a PowerPoint presentation showing some of
Richard Avedon’s photographs of people with various expressive qualities. She
began using some VTS (Visual Thinking Strategies) questioning
to activate the students thinking. “How do they look?, How can you tell
how they are feeling?, What makes you think that?, How do you think they are
feeling?. Etc.”
The presentation also presented information like “60 – 90%
of human communication is non-verbal” and discussed the importance of body
language. She then asked the students about the connection they could guess
between body language and improvisation.
She followed the presentation with a TEDx talk on
improvisation. “Dave Morris – The way of improvisation” https://www.youtube.com/watch?v=MUO-pWJ0riQ
In this talk, Morris talks about the importance of failure to success in life.
He emphasizes, “Failing does not make you a failure.” I love that the main
components of improv are all about collaboration,
listening and change.
And then followed it with a short clip from the 90’s hit “Whose
line is it anyway?” https://www.youtube.com/watch?v=uaZv9pEyAdQ
Clair asked all of the students to stand up in a circle
around the room and we played a short improv game called “Zip, Zap, Zop”. The
goal of the game is to encourage listening skills and
to be collaborative. To play the game, a student would shout “ZIP!” and
point across the circle to another student who would then shout and point
“ZAP!” to another student, followed by a third who would shout and point “ZOP!”
and the cycle would repeat around the circle, trying to get as fast as we could
go. This simple sounding game really
pushed the kids to pay attention and helped develop some commitment to their
part as you have to be pretty direct with your pointing if the person across
from the circle from you is to know who’s turn is next.
Clair then introduced another improv game called Funny noises. She asked one student to develop a noise and
to basically play telephone by each person sending that noise around the
circle. Students had to pay attention and listen for when the sound came to
them. To up the game, a second noise was
introduced and it was sent in the opposite direction around the circle. Inevitably, students would be tasked to send
both noises in different directions around the circle at the same time.
The last game Clair played with them was called “The world’s
worst”. She reviewed with them the job of an EmCee (to be the rule maker and
moderator), what it meant to keep participation school appropriate (otherwise
she would call out “too blue” and you would be removed from the scene) and the
roles of a good audience.
Four volunteers stepped up and each used body language alone
or speech to demonstrate the world’s worst of some profession or skill
(suggestions offered by the audience)… World's worst cashier, world’s worst
waiter, world’s worst driver, etc. After
a group of four performed a new group of student volunteers joined in and tried
out a new “world’s worst theme”. It was
quite a lot of fun and I think that it will be a great one or two day addition
to this creativity curriculum as it teaches so many great skills.
Improvisation: Acting with little
or no practice, playing with ideas and actions, doing stuff on the fly…just
like life!
Friday, February 7, 2014
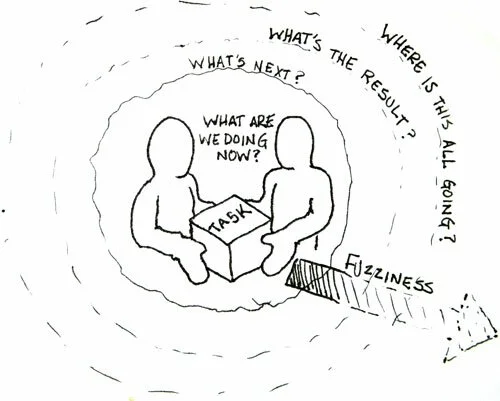
The Benefits of Fuzzy Goals
Fuzzy goals
I’m home again on what is now our 12th or 13th
snow day this year. At this rate, we
will be making up snow days well into the end of June. I’m ok with it as I have
plenty to keep me busy, including preparing for some upcoming presentations on
the creativity curriculum I am documenting through this blog.
I stumbled upon a great book in my monthly Amazon book browsing
(aka binge purchasing) called “Gamestorming: A playbook for Innovators,Rulebreakers, and Changemakers” by Dave Grey Sunni Brown and James
Mancanufo. It is a book written for
business people looking to create change and inspire innovation in their
organizations. In the introduction, the authors write about something called
“fuzzy goals” that I would like to share and offer the suggestion to think
about how it relates to education and in particular in teaching creative and
critical thinking.
“Like Columbus, in order to move forward toward an uncertain
future, you need to set a course. But how do you set a course when the
destination is unknown? This is where it becomes necessary to imagine a world;
a future world that is different from our own. Somehow we need to imagine a
world that we can’t really fully conceive yet-a world that we can only see dimly
through a fog.
In knowledge work we
need our goals to be fuzzy. “ p. 5
I think what is happening with this creativity curriculum that
is different from what a traditional art teacher might teach, is that the goals
are not as precise, the way I ask my students to approach the challenges cannot
be designed fully in advance, nor can they be fully predicted.

In education, we have this expectation of a “secure chain of
cause and effect”, We use SMART goals. We lay out very detailed plans of how learning objectives will be achieved and map every detail out to the nth degree. However, real true creative growth and innovation happens when a chain is not
followed, but rather there is a framework for exploration, experimentation, and
trial and error. The same is true for
retention of information. When I think about the bits of knowledge that have
been exposed to over the course of my own school experience, those opportunities
to connect the learning in a meaningful way through exploration,
experimentation, and trial and error are the only ones that really stuck.
Our purpose of education is not for kids to memorize and
cram in information only to forget later after the project is complete or a
test has been taken. We should provide spaces for them to create their own path
and make connections that will last. (This thought came to me after
participating in a conversation with some other teachers about how happy we
should be about our standardized testing coming in the spring next year, rather
than the fall, so that they information will be fresh and thus kids will score
better. And I wondered to myself, “Why
are we even bothering to teach at all if we know and expect our kids to forget
the information later?”)
In the real world and
in life, the path to the goal is not clear, and the goal may in fact change.
In business, this is sometimes referred to as “sideways
management”.
A fuzzy goal is one that motivates the general direction of
the work, without blinding the creator(s) to opportunities along the journey.
So, how does this happen?
According to Gamestorming:
“What’s the optimum level of fuzziness? To define a fuzzy
goal you need a certain amount of ESP: fuzzy goals are Emotional, Sensory, and
Progressive.
Emotional: Fuzzy goals must be aligned with (students)
passions and energy for their project. It’s this passion and energy that gives
creative projects their momentum; therefore, fuzzy goals must have a compelling
emotional component.
Sensory: The more tangible you can make a goal, the
easier it is to share with others. Sketches and crude physical models help to
bring form to ideas that might otherwise be too vague to grasp. You may be able
to visualize an effect of the goal, such as (the viewers experience).
Progressive: Fuzzy goals are not static; they change over
time. This is because, when you begin to move toward a fuzzy goal, you don’t know
what you don’t know. The process of moving toward the goal is also a learning
process, sometimes called successive approximation. As the (student) learns,
the goals may change, so it’s important to stop every once in awhile and look
around. Fuzzy goals may be adjusted and sometimes completely changed based on
what you learn as you go.
(Students) need to navigate ambigious, uncertain, and often
complex information spaces. What is unknown usually far outweighs what is
known. In many ways it’s a journey in the fog, where case studies haven’t been
written yet, and there are no examples of where it’s been done successfully
before. Voyages of discovery involve greater risks and more failures along the
way than other endeavors. But the rewards are worth it.” p.8
Subscribe to:
Posts (Atom)